Whether you use one or more external hard drives with your Mac to store videos, backups,
Advertising
Advertising
The macOS application calledThe disk utility allows you to clean and reformat external and internal disks in a few clicks. You can also choose a file system for different partitions if you want to share the disk with friends using Windows, or use it yourself.
In this step-by-step guide we'll show you howQuickly clean and format external hard drives connected to your Mac using macOS Disk Utility. We'll cover the partition tables supported by macOS and other important technical details available to you through Disk Utility.
How to clean and format external drives on Mac
one)Launch Disk Utility in your preferred way. (for example through search)
Advertising
Advertising
2)In the sidebar, select the drive or partition you want to clean up.
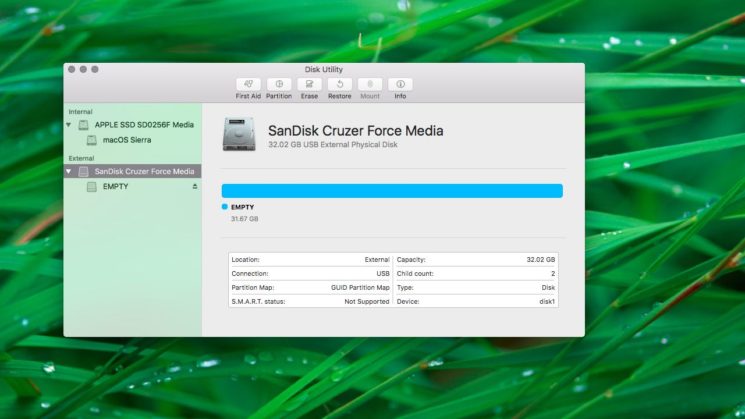

The disk utility allows you to clean partitions or disks.
If you want to reset the entire disk along with all the partitions on it, select it in the sidebar, and not one of the partitions.
Is there a significant difference between disk cleanupand section? Yes, there is: Disk Cleanup erases all partitions and the files located on them; clearing a partition deletes all files on it, but does not affect other partitions.
3)Click the buttonErasein the top bar of Disk Utility.
Please note that you cannot clearthe device on which the boot partition is located. To do this, you need to boot your Mac from another drive or enable recovery mode. This special mode allows you to not only erase the boot partition, but also execute commands in the terminal, reinstall macOS and other necessary tasks.
four)Open the dropdown list"Format"and select one of the available options:
Advertising
Advertising
- Mac OS Extended (Journaled)Uses Mac format, protects file system integrity.
- Mac OS Extended (journaled, encrypted).Uses Mac format, requires a password, and encrypts data on disk.
- Mac OS Extended (case sensitive, journaled).Uses Mac format and is case sensitive. For example, folders named “Homework” and “HOMEWORK” will be considered two different folders.
- Mac OS Extended (case sensitive, journaled, encrypted).Uses Mac format, is case sensitive, and encrypts data on disk.
- MS-DOS (FAT).Uses PC format on partitions up to 32 GB in size.
- ExFAT.Uses PC format on partitions larger than 32 GB.
The set of options depends on the type of disk.
Advertising
Advertising


If you plan to use the repository onlyfrom macOS, select the journaling or advanced option. This protects the integrity of the default HFS + hierarchical file system.
Formatting a disk into one of the PC formats is needed for compatibility with Windows.
Note: for MS-DOS and ExFAT partitions, the name must be no longer than eleven characters due to limitations of the Microsoft file system.
Enabling encryption will require a password.


Be sure to write down the password and store it insafe place: you will need to enter it every time you connect the drive to the computer. If you forget the password, you cannot decrypt and access the data on the disk.


To change the disk encryption password, select it in the sidebar and click Change Password on the File menu. To disable it, press the Option key while selecting the section you want and use the option“Decrypt [section name]”.
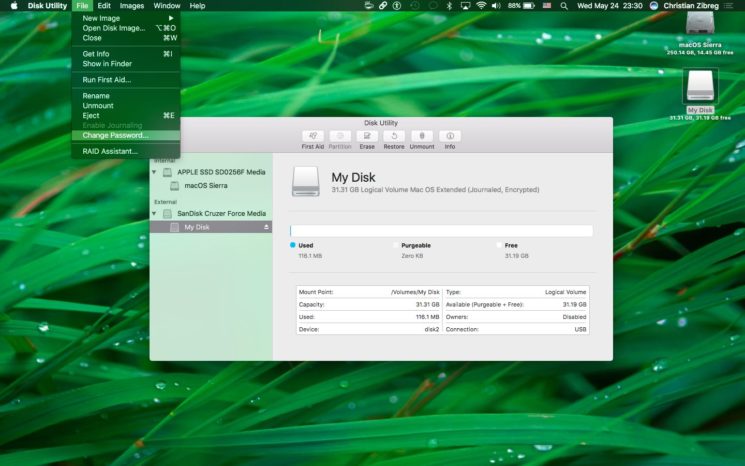

If you want to encrypt a drive without wiping the data on it, turn on Apple FileVault encryption in Security Settings, or press Control while selecting the drive in Finder and select“Encrypt [section name]”in the pop-up menu.


five)Enter the new section name in the appropriate field.
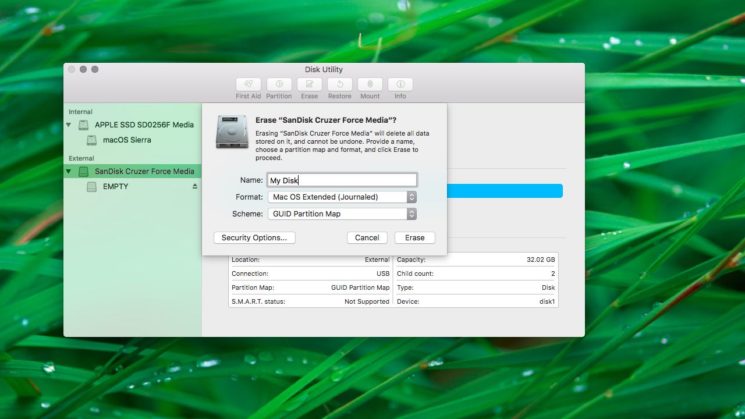

6)If you are erasing an entire disk rather than just one partition, select the desired partition table scheme from the drop-down list.
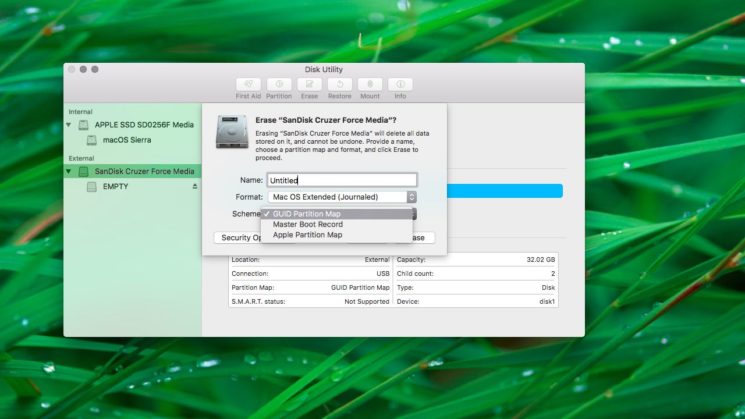

macOS supports the following partition tables:
- GUID Partition MapShould only be selected if you plan to use the drive exclusively with an Intel-based Mac.
- Apple Partition Mapexists for compatibility with older PowerPC-based Macs (OS X 10.4 and older).
- Master boot record(or “fdisk”) is needed for compatibility with Windows installed via Boot Camp or on another computer to which you need to connect an external drive.
7)To prevent recovery of cleaned files, you can open in Disk UtilitySecurity optionsand use the slider to indicate how many times the information will be overwritten.
Overwrite options are not available for flash media, as Apple recommends using FileVault when using external SSDs.
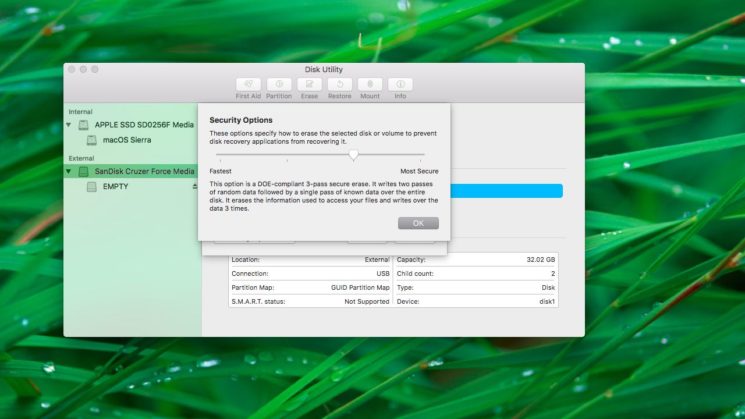

"The fastest"rewriting doesn't really provideproper level of security, so that data can be recovered using special programs. The next option will write a random set of data to disk followed by zeros, thus erasing all information about your files.
The last two levels overwrite the data three times (which meets the US Department of Energy standards) and seven times (corresponding to the US Department of Defense standard 5220-22-M), respectively.
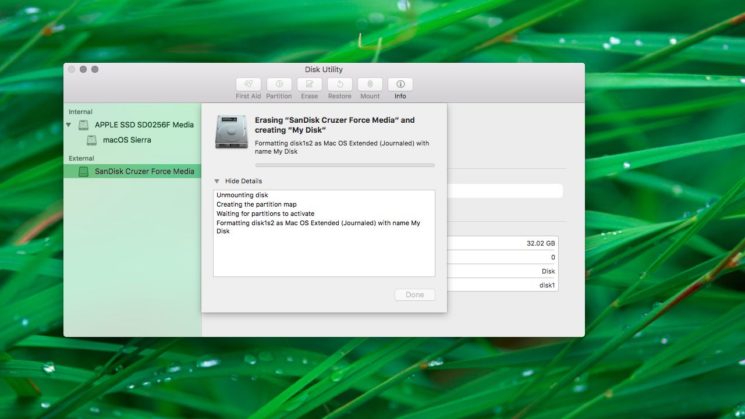
eight)Click the buttonEraseto start formatting the disk.

Advertising
Advertising
You will see that the disk icon disappears from the desktop. Do not worry, it will be back as soon as Disk Utility completes the formatting process.
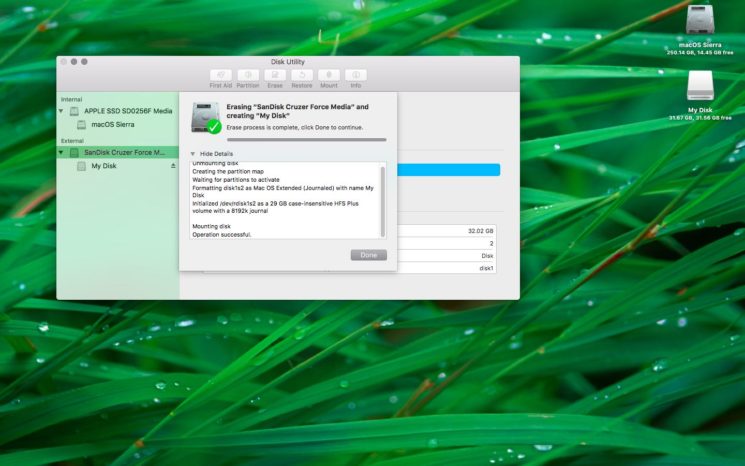

As already mentioned, this operation erases all data from your disk. With all my heart, we recommend that you save all the necessary files to another disk before you start it.
9)After cleaning and formatting the disk is complete, close Disk Utility.
Congratulations, your disk has been cleaned, reformatted, and ready to use. Remember to unmount your external storage devices after completing work with them.
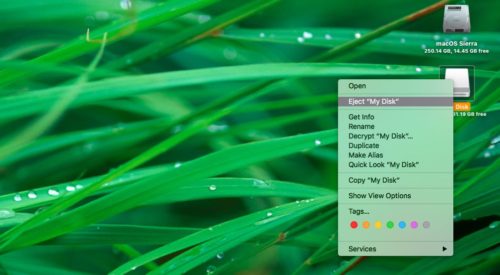

To do this, right-click or Option-click the external drive icon on your desktop and select“Extract”. You can also drag it to the Trash.
Failure to complete these operations before disconnecting a drive may result in data loss.
If you have any questions regarding this manual, ask them in the comments. Also do not forget to share your favorite post with your friends!