Will the new Clips app replace the iMovie video editor? Not really. Clips app is generational
This article will show you how to create and edit videos with the Clips app, Apple's latest app designed primarily for entertainment.
Advertising
What is the new applicationClips?
New Clips is a fun and simple appApple for creating and editing videos. The application on the iPhone is clearly adapted for creating selfie videos - when you open the application, it is the front camera that is launched. The iPad version is focused on presentations. However, in principle, the functionality of the versions of Clips for iPhone and iPad is the same: what you create, and how you use it, depends only on you. According to Apple, Clips is "a new iOS app for creating and sharing fun videos with text, effects, graphics."
If you own an iPhone with iOSiOS 10.3 or later, you can download the Clips app from the App Store. Perhaps one of the undoubted advantages of Clips is the ability to record videos up to 30 minutes long (this can be either one or several related clips).
How to downloadClips+ list of compatible devices
As mentioned above, if you havedevice with iOS 10.3 or later, you can download the Clips app from the App Store. This means the app is compatible with both new and old devices, including (but not limited to) iPhone 5, iPhone 6s, iPhone 7, and iPad Air, iPad Pro and iPad mini 4. To download Clips on iPhone or iPad :
Advertising
Advertising
- Open the App Store.
- Click "Search" and enter “Clips Apple.”
- The first application to appear is Clips.


- Click on the cloud icon with an arrow pointing down.
The download of the application will start.
How to use the applicationClipsfor shooting and changing video toiphoneoriPad
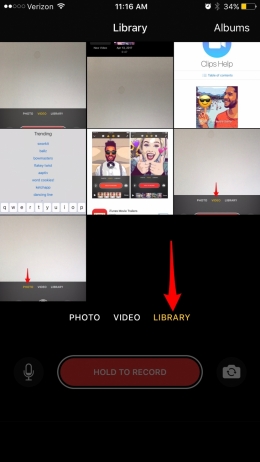
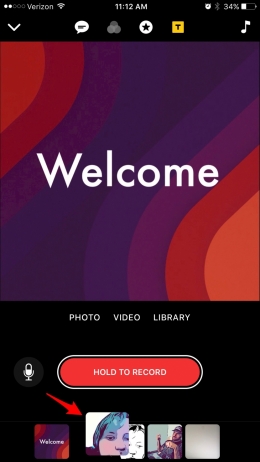
As soon as you launch the Clips app on the iPhone, the camera will open in Selfie mode, ie. looking at you. So, some basic information about Clips:
- At the bottom, you will see a large red button labeled “Hold to Record”. As it becomes clear, to record video you need to hold it.


- By default, video is recorded. You can also select "Photo" above the red button and take a photo to be added to your video.
- You can also upload photos or videos directly from your device by tapping Photo Library.


- You can also take multiple clips and photos(or choose ready-made in the library on iPhone). As long as the total recording time does not exceed 30 minutes, you can add any number of different photos and clips. They will be stitched together into a new video.
- In the description of the video editing rules, this article will tell you how to swap the clips and photos that make up your video.
- Since the video you create consists of many small videos and photographs, you can edit the components separately or make them the same style for a unified overall picture.
- Click the arrow in the top left corner of the app to select a video to edit or to create a new video.


- An Internet connection is required to access all of the Clips features.
These are the main features of the Clips app, howeverthere are several additional features. The most notable of these is Live Titles, which allows you to record audio with real-time subtitling. Other features of the application, which will also be covered in the text of the instruction, are video filters, effects, screensavers, the ability to add music, edit videos and send to friends.
Live Headers
When the option "Live Titles" is enabled, Clipscreates subtitles in sync with the user's voice. The function does not work perfectly. It will be necessary to create conditions in which there will be a minimum of extraneous noise (for example, recording from Red Square will not work at all); you will have to speak very clearly and at a normal pace. To date, the application is not capable of handling vocal intonations and accents well. However, if Clips makes a mistake in recognition, the subtitles can be edited. So, to use the "Live Titles" option and edit automatic subtitles, you must:
- In a running application, click on the first of the top icons (in the form of a cloud with text).
- Choose from seven possible fonts and styles for your caption.
- In the same menu, you can turn off the "Live Titles" function.
- Clicking on the style you want to use will take you to the recording screen.
- Hold the red button to take pictures. As you speak the words, the application will translate them into subtitles.
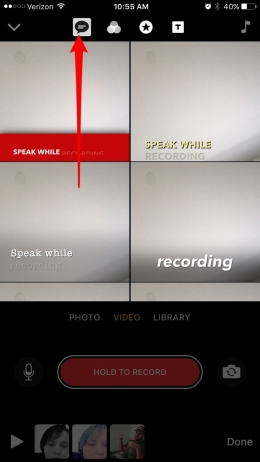


- Release the button to stop recording.
- At the bottom of the screen is the movie track. To play the video you just shot and check if the subtitles are correct, select the created video and play it.


- If errors are found, click on the pause icon and double click on the text. An editing window will open.
- Make any necessary changes to the text and click "Apply".
- When the subtitles look appropriate, click on the arrow below the video to return to the recording screen.


- If you want to overwrite the video, click on the trash can icon to delete. The following instructions will describe how to edit and compose individual clips.
You can also record a video first, and then, by clicking on the cloud with the text, select the desired type of accompanying subtitles.
Filters
Details of the filters you use whenposting photos to Instagram, the Clips app offers its own filters for photos and videos. You can use different filters for individual movie clips, or, conversely, give the components a single style. Filters are currently limited, but Apple is planning to release an update to the app. It is hoped that the options available will be expanded in the future. The filter can be applied both before and after recording; for this you need:
Advertising
Advertising
- Click the second of the top icons, which looks like three overlapping circles.
- A filter page will open with a preview for each option.


- Select the filter you want to use.
By clicking on a single clip, you can repeat these steps for it, adding or changing filters for different clips.
Effects: Stickers & Emoticons
You can also add stickers to videos in Clips andemoji. The app shows the 30 most used emoticons by default, but you can choose from others (as will be shown below). If you want to add effects to your Clips video:
- Click the third top icon - the star in the circle.
- Stickers available for adding will appear on the screen. Some of them include automatic display of time, date or location.


- Click on the sticker you want to add to the video.
- To view emoji, swipe the sticker screen to the left. The 30 most commonly used emojis will appear. Choose your favorite.


Tip: If the desired emoticon is not present, selectany. It will be added to your video. Then double click on it to select it. The iPhone's onscreen keyboard appears. Open the standard emoji keyboard and select the desired emoji and click "Apply".


How to insert and edit stickers and emoticons
After choosing a sticker or emoji, there are several options for setting:
- Press and hold on a sticker to edit the accompanying text.
- A single tap on a sticker or emoji will cause an X to appear for deletion.
- Single tap also allows you to select a stickeror an emoticon to move it around the screen. To change the size of an emoji or sticker, place two fingers on the screen and pinch or pinch to enlarge or shrink, respectively.


Screensavers
For a professional touch, you can add a splash screen to your video in Clips. To select and edit the screensaver:
Advertising
Advertising
- First of all, make sure you are on the mainapplication page. If you have entered the video selection mode, you will not see the splash icon. To return to the home page, tap the arrow below the roller.
- Click the fourth icon from the top row, which looks like a framed letter T.


- The application has a variety of screensavers to choose from. Select the one you want to use. When choosing, do not be guided by the text - you can change it.
- After selecting a screensaver, tap the text to edit it.
- Click "Apply".
- Now press the button that says “Hold to Record.” The animated screensaver will start playing; its duration can be adjusted by varying the time you hold the record button.


- Once filming is complete, the newly added intro will appear in the timeline of your video project. Wherever it is, you can grab it and drag it to the right place at any time.
You can create multiple screensavers. If you want to add an opening and closing screensaver, create two and drag to the beginning and end of the project timeline. Screensavers can also help you break down a video into its component parts.
Adding Music
You can add music to your video. When added, it loops, so you need to embed it in the assembled project. You cannot add music to individual videos. Several free songs are available in the app, and you can also add your own via the iTunes Store. However, music from Apple Music cannot be used here. To embed music into a project in the Clips app:
- First of all, make sure you are on the mainapplication page. If you have entered the video selection mode, you will not see the splash icon. To return to the home page, tap the arrow below the roller.
- Tap the note image in the upper right corner of the screen.
- Select the Soundtracks or Music option. If you wish, you can also disable adding a music track here.


- To select a song from your iTunes Store purchases, click Music.
- Once selected, the composition will appear under the video project timeline. Drag the track to where you want it to start.
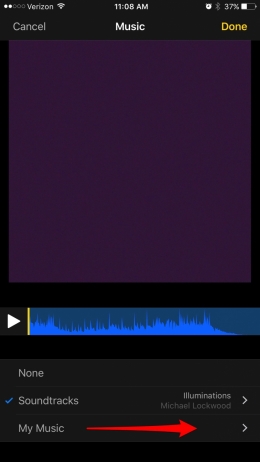

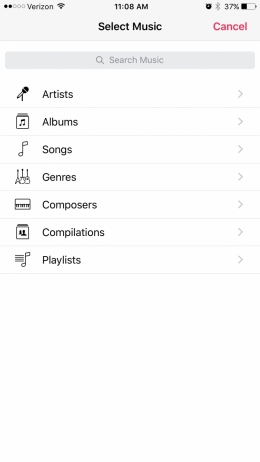

- Click on "Soundtracks" to choose from free options. By the way, the proposed list is quite extensive. Click the one you want to download.
- Tap the preview song again and select it.
- Go back using the arrow located in the left corner.


- If you decide to do without music, click "No".
- When finished, click “Done” to add music to your video.
If you want to embed a musical composition into a video that already has sound, the task is quite feasible. The volume of the music will automatically adjust to the volume of the audio sequence.
Editing and changing video settings
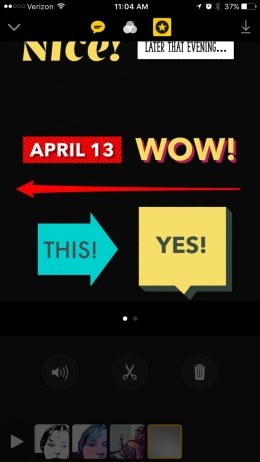
So, you have created a video in Clips and configured the softwareyour own discretion. It's time for final editing. You can move video clips in different order, turn the audio track on and off in individual videos, trim clips and delete them. To edit a video in Clips:
- The first step is to make sure you are on the main page of the application. To return to the home page, tap the arrow below the roller.
- The video timeline is displayed at the bottom of the home page. Click on the triangle to play.
- If necessary, grab and drag video clips to place them in the order you want.


- To edit a specific section of the video, tap it with your finger.
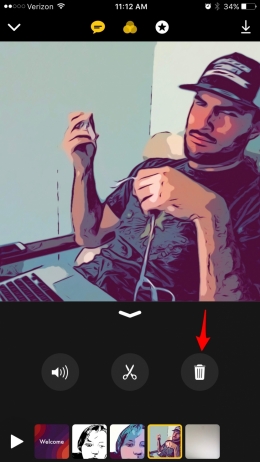
- The settings menu of the edited video will open, containing three icons: microphone, scissors and a basket.
- Press the microphone to mute. Pressing it again will return the sound to its place.


- Tap the scissors icon if you want to trim the video. Drag the start and end to the desired location. When finished, click Apply to save the new settings or Cancel to discard them.


- To delete a video clip, click on the trash can icon.

To switch to editing another video clip or to complete editing a project, return to the main screen by tapping the arrow below the video.
How to save and share videos
Once you have created and edited your video,it's time to share it with your friends! Apple has provided Clips with the ability to quickly send videos to friends via messages. When you want to share a video, a list of friends with whom you correspond quite often will be displayed at the top. You can also share Clips videos on social media or download them to Photos on your iPhone. To save a video and share it:
- Go to the main page of the Clips app. The video chronicle will appear at the bottom. Tap “Done” in the lower right corner.
- Click on the play button located at the bottom left of the screen to start previewing the video.


- If you want to make any other changes, click "Open".
- To save the video and/or share it, tap the corresponding icon in the lower right corner of the screen.


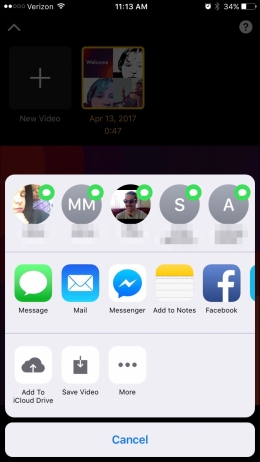

- A list of people with whom you frequently correspond will be displayed at the top; to send the video through messages, click on the contact icon next to them.
- In the center of the screen, other ways of sending videos to friends are displayed - via Mail, instant messengers, Facebook, Instagram, etc. Select the one you want.
- If desired, save the video to the Camera Roll by clicking the appropriate button.
- You can also add video to iCloud Drive, which will allow you to access it later from any of your devices.
Built-in user manualApple Clips
Since the Clips app was released quite recently,Apple has built a manual into it. If you need a refresher on the list of Clips features and the basics of using them, you can launch the manual directly from the app. To open the Clips guide:
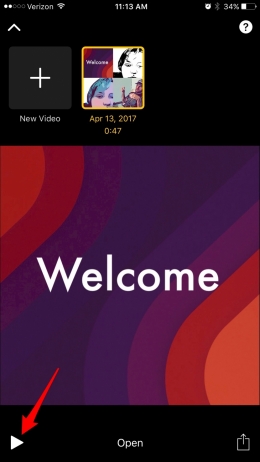
- On the home page that launches when you open an app, tap the arrow in the upper left corner of the screen.
- A page will open with a list of all the videos you shot and the option to create a new video.
- To launch the guide, tap the question mark located in the upper right corner.


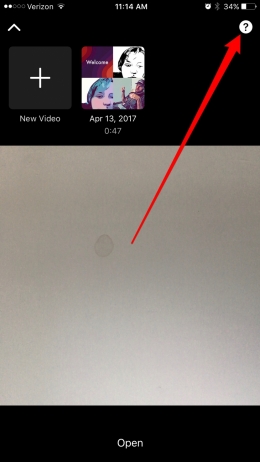

- You will be presented with a detailed guide from Apple on using the Clips app. To access the table of contents, click on the icon in the upper left corner of the screen.
- When you finish reading the user manual, tap the Done button in the upper right corner.

