We all know how important it is to back up our mobile devices. But what if on your Mac
- How to Backup iPhone or iPad to External Hard Drive on macOS
- For advanced users
- Windows 10
- Method 2: how to copy an iPhone or iPad to an external drive in Windows 7, 8, 10
- How to backup iPhone or iPad to an external drive
- How to restore iPhone or iPad via iMazing
How to backup iPhone or iPad to external hard drive in macOS
Creating a backup is very easy.process, but you will experience some difficulties if there is not enough memory left on your computer. To solve this problem, it is advisable to understand a little on the command line. And of course you need your mobile device, a USB cable and an external hard drive. If everything is ready for you, then we can proceed.
Advertising
Advertising
Step 1.
Connect your external hard drive to your computer.Make sure you have enough free space on your external hard drive to back up your iPhone or iPad. On the disk, create a new folder named “iPhoneiTunesBackups”.
Step 2
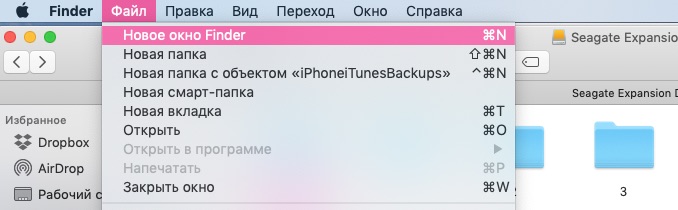
Open a new Finder window by opening Finder (Command + Spacebar and typing Finder), then open the itemFile -> New Finder Window.

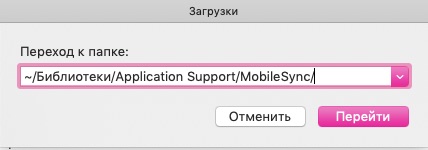
In the new Finder window, clickCommand + Shift + G, so that the address bar appears. In the empty text field, enter:
Advertising
Advertising
~ / Library / Application Support / MobileSync /

Step 3
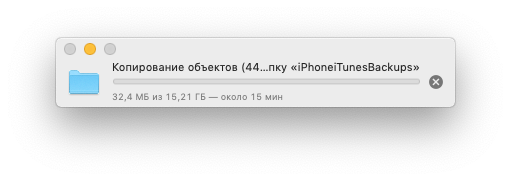
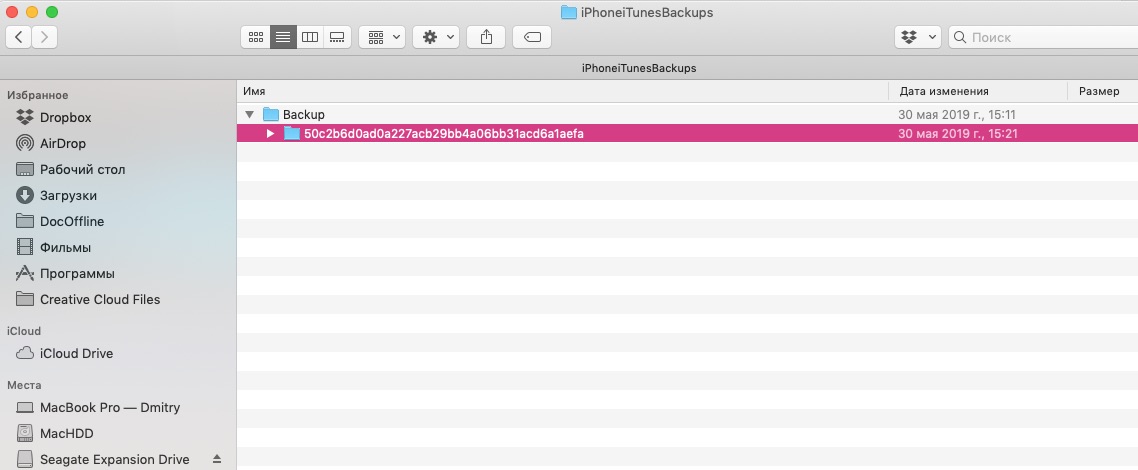
You will find yourself in the folder with which we will work. Select the folder called “Backup” and copy it.


Step 4.
Go to your external hard drive and find the folder you just created. In our example this is the folderiPhoneiTunesBackups.Paste the folder from here3 steps.
Step 5.

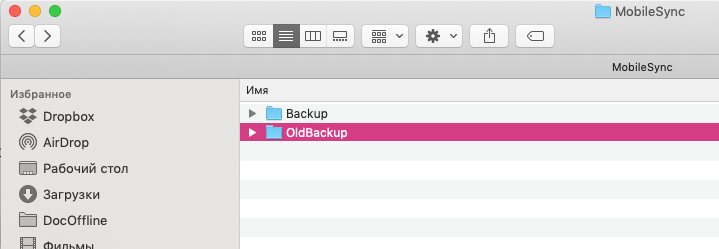
Make sure the folder is copied correctly. Now, returning to the original folder (~ / Library / Application Support / MobileSync /), rename the folder to BackupOld or something similar.

You can also delete this folder, but in our example we will leave it.
Step 6
Openterminal(Command + Space and type terminal) and enter the following line:
ln -s / Volumes /MYPASSPORT/iPhoneiTunesBackups/Backup/ ~ / Library / Application Support / MobileSync
Replace in this lineMYPASSPORTto the name of your hard drive and folder nameiPhoneiTunesBackupsto your own if they differ from our example.
Once you have verified that everything is entered correctly, press ENTER and close the terminal.
Attention! If the name of your external hard drive consists of several words with spaces, then you must add a backslash to the command above before each space
Step 7
To figure out what happened after entering this command, do it againStep 2. If you did everything correctly, then in the folder~/Library/Application Support/MobileSync/ You will see the old backup folder and the new Backup folder with an arrow. The arrow means that this folder now links to the folder located on the external hard drive.


Step 8
Open iTunes and connect your device. In the “Backups” section, select “This computer”and pressCreate a backup copy.The new backup will be stored on your external hard drive.


Step 9
Verify that the latest backup wasIt is saved on the hard drive. To do this, look at the date of the last modification of the iPhoneiTunesBackups folder, or check for new directories in it.

Now every backup of youriOS devices will run on an external hard drive. You do not need to constantly keep an external hard drive connected, you can only connect it when you are going to perform a backup.
If you want to return everything to its original state, simply go back to ~/Library/Application Support/MobileSync/ and delete the arrow folder. Then rename the old folder to Backup. That's all.
For advanced users
Advanced users can also perform the entire process of creating directories, copying and creating links from the command line. With the following commands:
mkdir / Volumes / ExternalFileStorage / iTunesDeviceBackups /
cp ~ / Library / Application Support / MobileSync / Backup / Volumes / ExternalFileStorage / iTunesDeviceBackups /
cd ~ / Library / Application Support / MobileSync /
rm -r Backup /
ln -s / Volumes / ExternalFileStorage / iTunesDeviceBackups / Backup / ~ / Library / Application Support / MobileSync /
Windows 10
For Windows, the procedure is identical, except for step 6.
Call the command line using the combination WIN + R and type cmd. Insert the following line into the command line (we will consider E: this is the letter of the external hard drive):
Advertising
Advertising
mklink /J “%APPDATA%RoamingApple ComputerMobileSyncBackup” “E:iTunesDeviceBackups”
Method 2: how to make a copyiphone oriPad to an external drive in Windows 7, 8, 10
Depending on the amount of your data, a copyAn iPhone or iPad can take up quite a bit of computer space. For those who do not have this place, there is also a solution - use an external hard drive. This can be done using the iMazing program, in which you can make backup copies of devices and manage files and information on them.
Next, we show how to use iMazing and save device backups to an external hard drive via a Windows PC.
How to make a copyiphone oriPad to an external drive
Step 1:Download and install the iMazing program on your computer.
Download: iMazing
Step 2: Connect your iOS device to your computer and open iMazing.
Advertising
Advertising
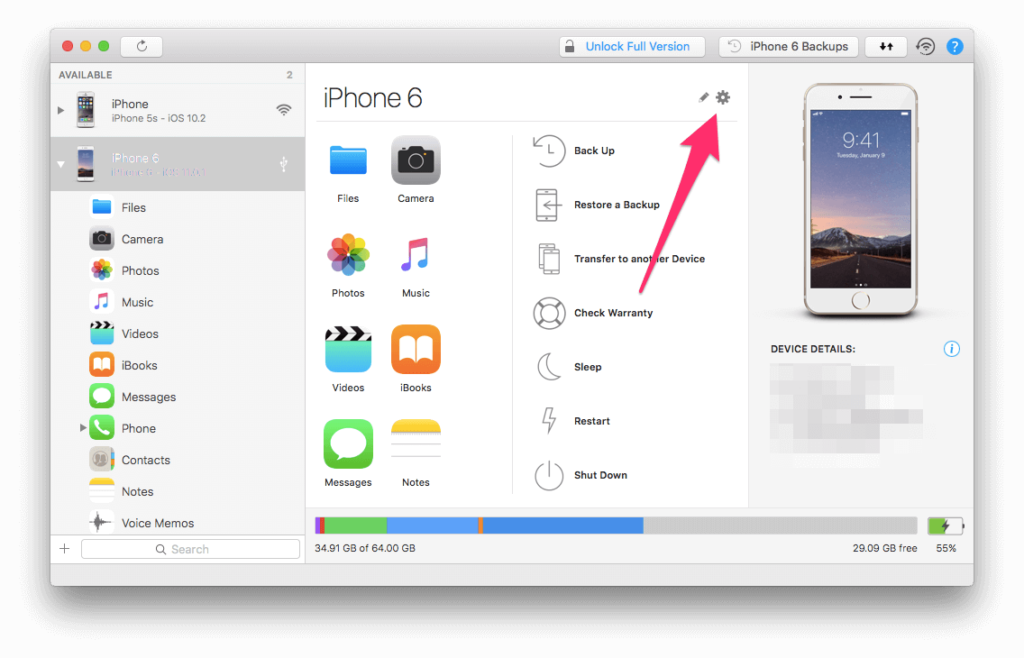
Step 3: When iMazing discovers the device, the first thing you need to do is change the backup location. To do this, select your device in the menu on the left.


Step 4:Click on the gear icon to open settings.

Step5:Next clickChangeNearBackup location.
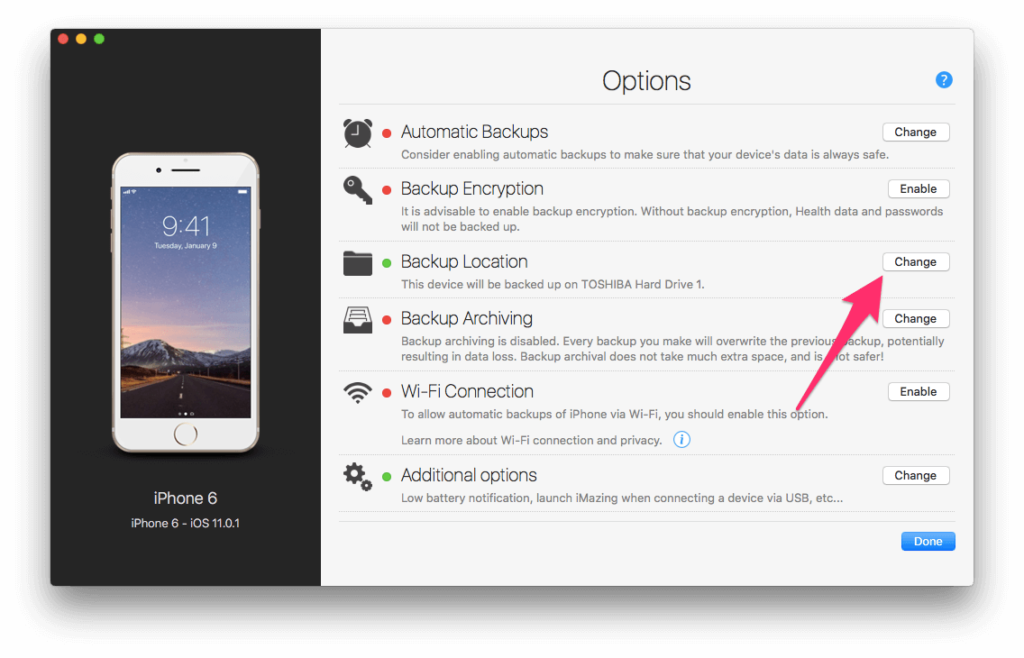

Step 6:Select the one you needexternal driveor clickChoose a custom locationto select a specific folder on this drive.
Step 7:ClickDoneto save a new place.
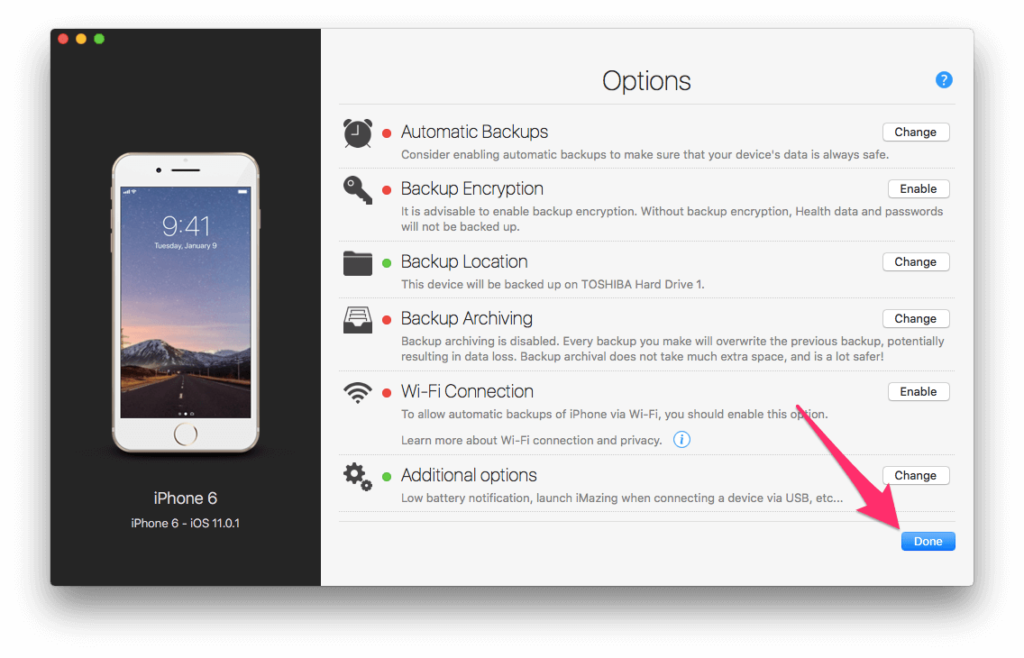
Step 8:Click againDoneto close the settings.

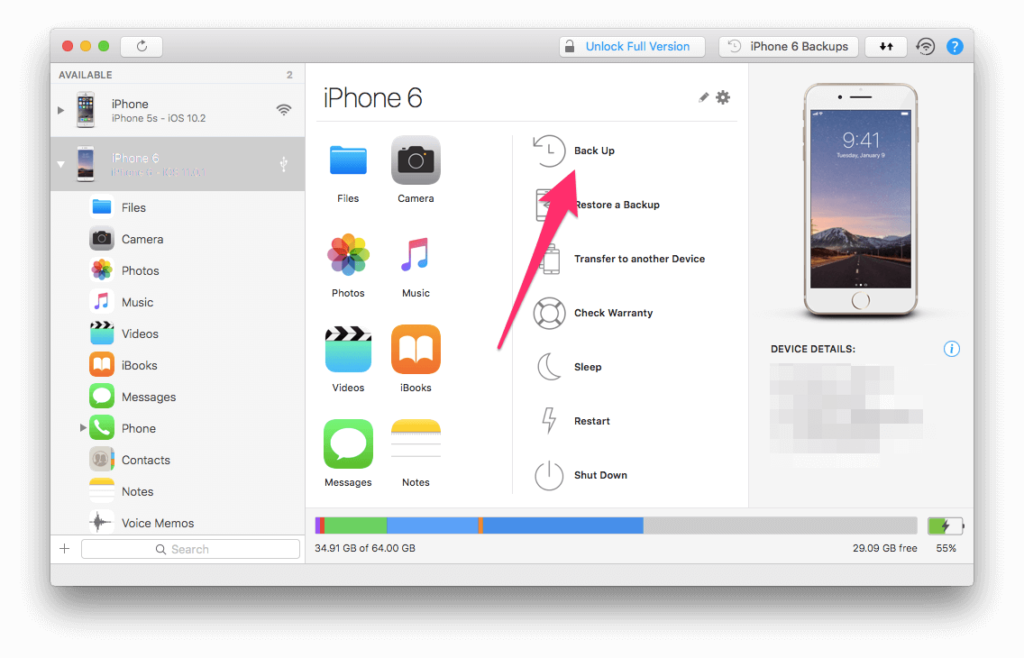
Step 9:To make a backup, click on the buttonBack Up.

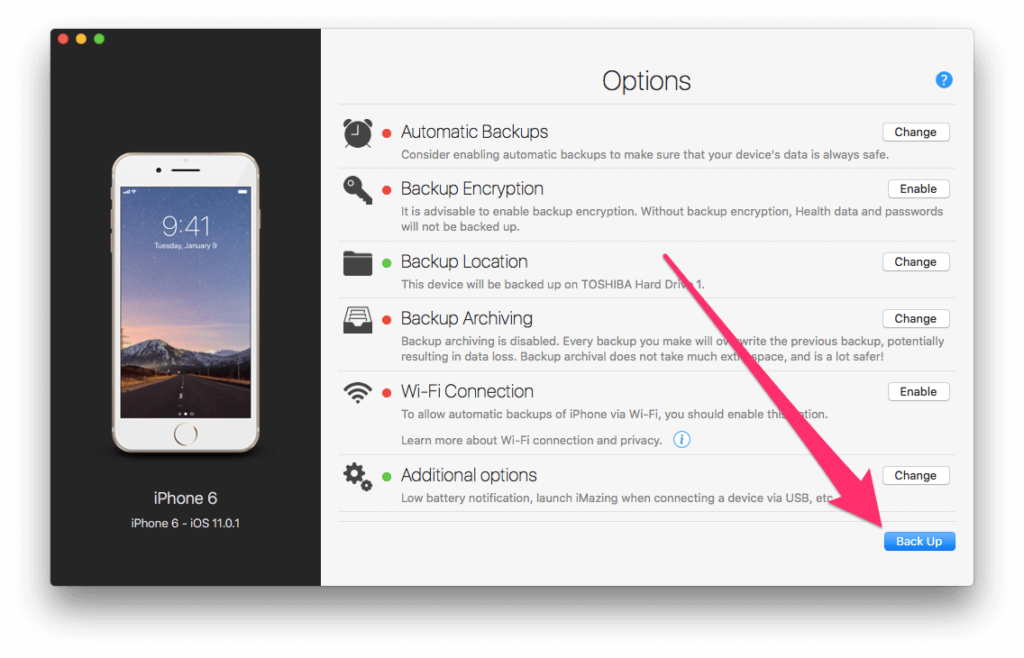
Step 10:Configure all available options and then click the buttonBack Upin the lower right corner.

Stepeleven:iMazing will begin the backup process. It will take from a few minutes to half an hour depending on the amount of data on your device.
Advertising
Advertising
The folder “iMazing.Backups” will appear on the external drive, where all your copies will be stored. Do not delete it or change the contents, otherwise it may damage the copies.
How to recoveriphone oriPad throughiMazing
Step 1:First, you need to disable Find My iPhone. OpenSettingsand click on your name at the very top. Then go toiCloud> Findiphoneand turn off the switch.
Step 2:Connect your device to your computer and open iMazing.
Step 3: Select your device in the menu on the left and clickRestore a Backup.
Step 4:iMazing will show a list of all saved copies that are compatible with the device. Select the one you want and clickChoosein the lower right corner.
Step 5:If you want to manually select which applications and data to restore, click the buttonCustomize, if not, clickNext.
Step 6:ClickNextto confirm the restoration. In the next window, clickRestore.
- Note: If the backup is protected, you will need to enter a password.
Step7:iMazing will begin the recovery process. You can press at any timeClose Windowto return to the iMazing main window, and recovery will continue in the background. When the process is completed, the device will reboot, and you can continue to use it as usual.
You can use some functions.iMazing (creating copies and installing applications) in the trial version, but to restore or update the system you have to buy a license. A license for one computer can be bought for $ 39.99, universal for $ 49.99, and for five computers for $ 69.99.
Download: iMazing