Newer iPhone models have amazing cameras, and Apple erases as usualboundaries with the help of its system
Below we will describe how to use them.
Advertising
Advertising
1. EditingLive Photos
You can finally edit Live Photos. This works the same way as video editing. Now you can cut them and remove the sound from them. You can also select a cover.
Step 1: Open Photos and find the live photo you want to edit. In the section with Albums there will be a separate folder with live photos.
Step 2: Select a photo and tapChangeat the top of the screen.
Advertising
Advertising


Advertising
Advertising
A screen with an editor opens.
A. Remove the sound: To remove the background sound, click on the speaker icon in the upper left corner of the screen on the iPhone or in the lower right on the iPad.
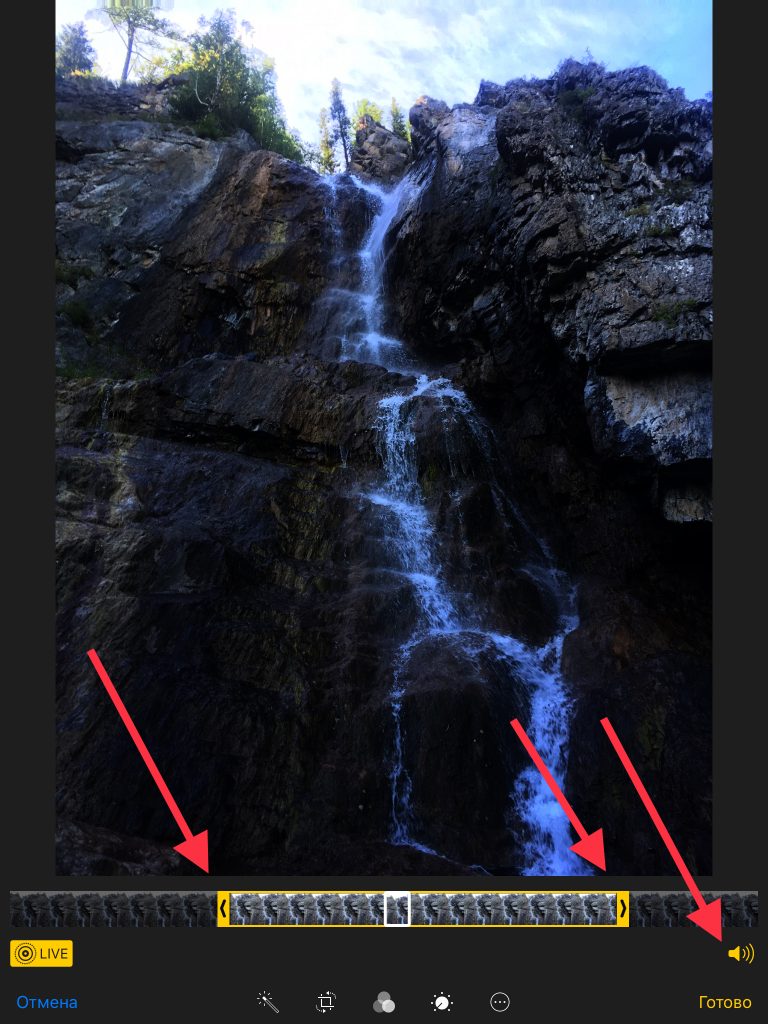

B. Trim: There will be a familiar strip of frames at the bottom of the screen. It shows a preview of the photo. Click on the strip and you will see two yellow arrows on the sides. Hold any of them and you can move it. These are the start and end points of live photography. Slide them as you like, and then tap Done to crop the photo.
B. Select cover: In the same tape, you can click on any frame and select Make photo main to put it on the cover of a live photo.
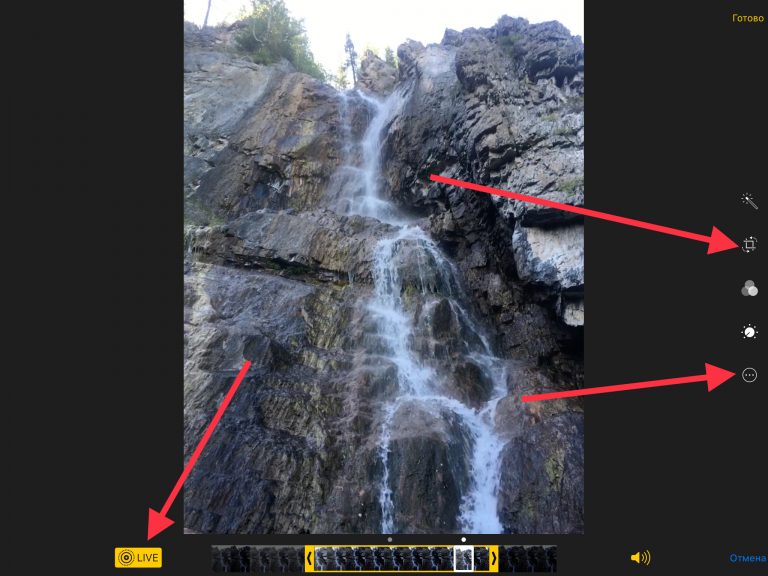

Please note that if you change the cover, the quality of the photo will become worse (at least in terms of megapixels). For the sake of saving memory, iOS does not take all the frames in the best quality.
G. Live: If you want to remove the “live” part of the photo, click on the yellow plate with “Live” at the top of the screen on the iPhone or below on the iPad.
E. Standard editing: Standard editing options are also available for live photos. In the editor, you just need to click on the menu and select Details.
2. Adding Effects toLive Photos
Once you open a Live Photo, swipe up on it and more options will appear.Here you will find the sectionEffects.
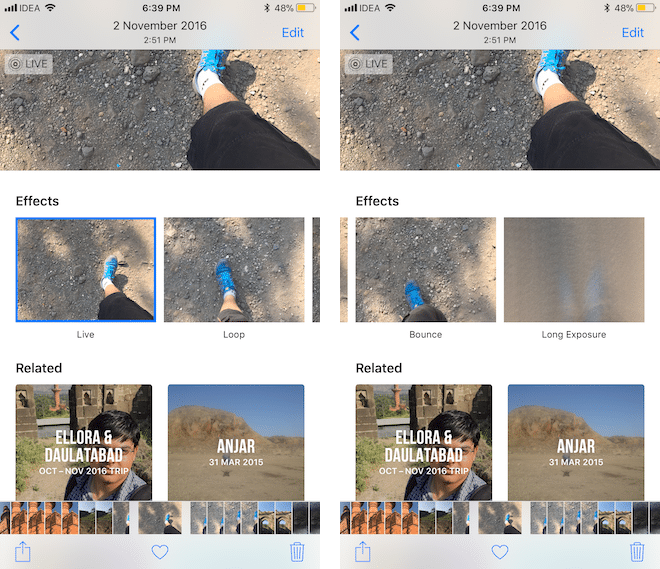

You will be offered three effects. Click on any of them to apply it to the photo.
Loop: The Loop effect turns your Live Photo into a GIF. With it, the animation repeats endlessly, and you do not need to clamp the screen.
Bounce: The Bounce effect is similar to the Boomerang on Instagram. At the end, the animation will start playing back to front. With this effect, the videos are very funny.
Advertising
Advertising


Long Exposure: Long Exposure freezes photo elements and blurs them. This effect is perfect for live wave photography. It turns Live Photo into a regular photo.
Advertising
Advertising
Testing the new long exposure option on iOS 11 # iOS11 #iPhone #photography #camera pic.twitter.com/8OOIrjkMKq
— Javier Gallo (@Happygallo) July 2, 2017
If you don’t like any of the effects, you can return to the original photo by swiping up and clicking cancel.
3. Creating new Memories
IOS 11 also updated face recognition technologyand figures. Now the system can determine a large set of events, people and even animals. According to Apple, new categories recognize birthdays, weddings, children, animals, outdoor activities, performances, sporting events, etc.
4. View Memories at any orientation
In addition, Memories can now be viewed in both portrait and landscape mode. Just flip the phone and the video will automatically rebuild.
5. Shutdown blur on portrait photographs
In iOS 11, Apple considers Depth photosEffect as Live Photos. Now at the top of these photos you will see the Depth Effect tag. And each time you take a portrait photo, two photos will not appear.
The user will see only one photo. But this does not mean that now it is impossible to access the original.
Step 1: Select a portrait photo and tapEdit.
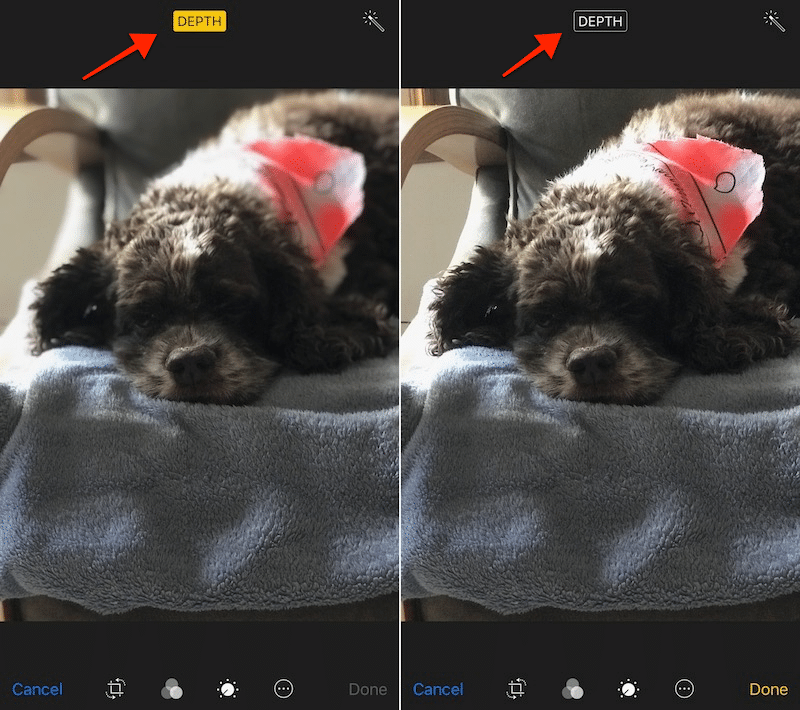

Step 2: Then click on the yellow buttonDepthup. This will turn off the background blur effect.
6. SavingGIFphoto files


Now you don’t need third-party applications to save GIFs to your phone. Now they can be saved directly in the Photo.
And this is done very easily. Just hold GIF in Safari and select “save image”. After that you will find it in Photo.
7. New album with animations
An entire animation album was added. It will have Live Photos with Loop and Bounce effects, as well as your GIFs. With this album you can always quickly find saved gifs.


Next time, when you need to send a funny gif to a group dialogue, you will not have to look for it in some application or on the keyboard. You will know its exact location.
8. Sync faces between devicesiOS
IOS 10 introduces People as well asautomatic face recognition. But since Apple is very worried about your privacy, the scan was performed by the device itself. Because of this, when setting up a new device, the Photo application scanned all your photos anew, and this made it work more slowly or even heat up. Now this will not happen.
In iOS 11, this process has been improved. Scanning is still performed by one device, but the People album can be synced across all of its devices. If you have photos of your family and friends with tags, they will appear on all your devices.
9. Drag and Drop in the Photo application


The drag and drop feature was added to the iPad, and moving photos with it became much easier. Just select them and drag them to the desired application.
The function works in other applications. On the iPhone, it is also applicable. Thus, photos can be sorted by different albums.